
How to Uninstall Spybot Search & Destroy Completely
A clean removal isn't a registry purge. Preserve anything you may need, undo Spybot's persistent protection, let its own wizard remove the product, clean only the folders the vendor names, then make sure Windows is protected.

Quick answer
Before uninstalling Spybot, open Quarantine and restore only a file you have deliberately decided to keep, then run Immunization as administrator and choose Undo. Remove Spybot from Settings > Apps > Installed apps, or use Control Panel > Programs and Features if Settings sends you there. After the wizard finishes, delete only the confirmed Spybot program folder and C:\ProgramData\Spybot – Search & Destroy, restart, then verify that Microsoft Defender or your chosen antivirus is active. Don't download a loose uninstaller or delete every registry result containing “Spybot.”
“Completely” should mean no active Spybot, not no historical byte
People searching for a complete uninstall usually want one of three outcomes: Spybot no longer starts, Windows no longer treats it as the antivirus provider, or a future reinstall begins without corrupted settings. Those are sensible goals. Erasing every string that contains the product name isn't.
Windows applications leave different kinds of traces. Executables and services can still run; shared application data can preserve settings and logs; an uninstall registration can remain after the files are damaged; harmless event records, installer caches and restore-point data can retain the old product name. The first three may need action. The last group is normally evidence, not a threat.
| Finding after uninstall | Meaning | Action |
|---|---|---|
| Spybot process/service still running | Removal is incomplete | Restart, identify exact component, use the matching failure path |
| Vendor-named program or ProgramData folder | Known leftover location | Verify path and delete after the wizard/reboot |
| Spybot still owns Windows Security | Provider registration may be stale | Capture evidence; don't improvise protected-service edits |
| Old log, restore point or installer record | Historical trace | Usually leave it unless it causes a documented problem |
| Random registry search match | Provenance unknown | Don't delete merely because the word matches |
This guide therefore uses an operational test: after reboot, Spybot is absent from Installed apps, no Spybot component is active, intended Spybot protections have been rolled back, and exactly one trusted real-time antivirus is working. That's cleaner and safer than a screenshot claiming “zero registry keys found.”
Before you start, decide what must survive
Save the installer source, edition and version if you may reinstall. A screenshot of Spybot's edition/license view is useful, but never publish the license key. Export any scan report you need for a support or false-positive case. If this is a managed work PC, stop here and let the administrator remove the endpoint: provider registration and policy can be centrally controlled.
Check whether Spybot is currently running a scan, update or cleanup-at-reboot job. Let an ordinary update finish; stop a scan from inside Spybot rather than killing its service mid-write. Close browsers after saving work because the Immunization rollback can touch browser-related permission stores. Plug a laptop into power.
Create a Windows restore point before manual cleanup if System Protection is enabled. Microsoft's current System Protection guidance explains that restore points cover system files, registry and application state without replacing a personal-file backup. The restore point is insurance for the narrow cleanup, not permission to delete broadly.
Finally, decide which antivirus should protect the PC afterward. Free Spybot is usually a supplemental scanner, while paid editions can provide real-time protection and Windows Security integration. If Spybot is the registered provider, removal should be followed immediately by a provider check—not by a day of browsing unprotected.
Review Quarantine before the only restore route disappears
Safer-Networking's live Spybot 2.x FAQ explicitly recommends reviewing Quarantine before uninstall and warns that those files can't be restored afterward. This is the step generic uninstall pages most often miss.
Open Spybot as administrator, enter Quarantine and sort by detection date. If every entry is known unwanted software, you don't need to restore it simply because the product is leaving. If an entry is a document, utility or business file you believe was misclassified, verify the original path, detection name and reason, then restore that item only.
Restoration changes risk: the file moves back to a usable location. Don't bulk-restore a container and plan to “sort it later.” Keep the replacement antivirus active, update it and scan the restored file before opening it. If the file is irreplaceable but suspicious, preserve it offline and get a second expert opinion rather than running it.
Take a screenshot or export a report for any unresolved false positive. Once Spybot and its Quarantine are gone, the useful evidence is the detection name, path, timestamp and file hash—not the memory that “Spybot deleted something.”
Undo Immunization while Spybot still knows what it changed
Immunization is persistent configuration, not a process that disappears with the executable. Spybot can add hosts-file entries and browser permissions. Its current FAQ recommends undoing Immunization before uninstall “to avoid issues with the uninstallation process.”
Run Start Center as administrator, open Immunization and choose Undo Immunization. Wait for completion, open Show details and record anything that couldn't be reversed. Close all browsers during this step. Our full Spybot Immunization guide separates hosts, browser profiles and failure states if Undo reports an incomplete result.
If Spybot won't open, don't replace the hosts file with one downloaded from a forum and don't erase browser profiles. Use the official support route and Microsoft's own hosts-file reset guidance for the hosts layer. A browser-specific permission issue should be diagnosed in that browser/profile, not solved by deleting all browsing data.
Spybot Anti-Beacon can apply separate privacy immunizers. Search & Destroy's Undo doesn't prove those are reversed. Treat Anti-Beacon separately later in this guide.
Run the normal uninstall before touching leftover folders
On Windows 11, use Start > Settings > Apps > Installed apps. Search for Spybot, open the three-dot menu and choose Uninstall. Approve the User Account Control prompt and follow the vendor wizard. On Windows 10, the corresponding route is Settings > Apps > Apps & features.
If Settings doesn't expose the desktop-program wizard, use Control Panel > Programs > Programs and Features, select Spybot – Search & Destroy and choose Uninstall/Change. These are both supported in Microsoft's current Windows 10/11 uninstall guidance.
Read prompts instead of automatically approving removal of user data. If the wizard reports a file in use, note its full path and process name. Close the named application and retry. Don't delete the program folder first: the wizard may need its own manifest and service-registration logic to unwind the install.
When the wizard says it's complete, don't judge success from that dialog alone. Check Installed apps again, then continue with the vendor's two-folder cleanup and required restart. A desktop shortcut disappearing isn't a provider check.
The official screenshot is a product locator, not current Windows 11 navigation
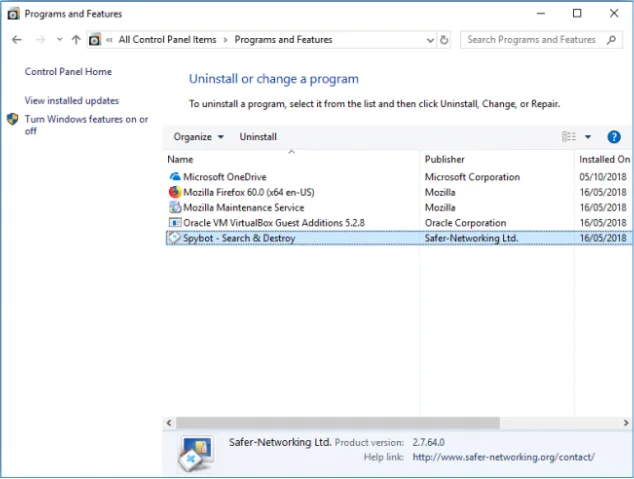
The vendor page remains live, but its image and “Organise” instructions are visibly from an older Windows era. That doesn't invalidate the product-specific sequence—select Spybot, run its wizard, delete the two named locations, reboot—but it does explain why a Windows 11 reader may not see the same toolbar.
A guide should state this drift rather than redraw a fake Spybot window. If your installed name includes an edition suffix or the publisher Safer-Networking Ltd., verify the installation path before removal. Don't uninstall an unrelated “Spybot” file found by search or a separate Safer-Networking product merely because the brand matches.
Delete only the two cleanup locations the vendor actually names
After the wizard finishes, the official FAQ recommends deleting the Spybot program directory and its shared data directory. On most 64-bit Windows systems the 32-bit Spybot 2 program lives under Program Files (x86); the 32-bit path is relevant only when the operating system itself is 32-bit. The folder may already be gone.
| System/location | Vendor-named path | What to verify |
|---|---|---|
| 64-bit Windows program | C:\Program Files (x86)\Spybot – Search & Destroy 2\ | Exact product folder and Safer-Networking files |
| 32-bit Windows program | C:\Program Files\Spybot – Search & Destroy 2\ | Use only on a truly 32-bit OS |
| Shared data | C:\ProgramData\Spybot – Search & Destroy | Exact hidden ProgramData child folder |
In Windows 11 File Explorer, use View > Show > Hidden items if ProgramData isn't visible. Navigate from the drive root; don't paste a path from a page and assume the dash character or folder name exactly matches your installation. Move only the confirmed Spybot folder to the Recycle Bin when possible, restart, and empty it after the PC proves stable.
Don't delete Program Files, ProgramData, the shared AV parent folder or a user's whole AppData. Don't search the registry for “spybot” and remove every result. Some records may be installer inventory, compatibility history or evidence needed to repair the failed uninstall. A generic registry cleaner can't understand your intent from the word match.
If your goal is a clean reinstall rather than permanent removal, the ProgramData folder is the setting-reset boundary that matters most. Preserve logs separately if support needs them, then remove the exact vendor data folder so a damaged local database isn't reused.
Restart, then verify the protection state—not just the folders
Restart Windows after cleanup. This releases files that were pending deletion, ends stale processes and gives Windows Security Center a chance to recalculate the antivirus provider. A sign-out isn't equivalent to a full restart for this check.
Open Windows Security > Virus & threat protection. If no other antivirus is installed, Microsoft's current antivirus FAQ says Defender should turn on automatically when another product is no longer installed and working. Confirm real-time protection, update protection intelligence and run a Quick scan.
If another trusted antivirus is meant to replace Spybot, verify that exact provider instead. Microsoft's consumer antivirus guidance warns that running two active antimalware products can cause problems. The target is one active provider, not “Defender plus everything.”
| Check | Green result | If it fails |
|---|---|---|
| Installed apps | No Spybot Search & Destroy entry | Use the matching broken-uninstaller route |
| Processes/startup | No active Spybot component | Restart; identify exact signed path before action |
| Windows Security provider | Defender or chosen replacement active | Capture provider screen and escalate safely |
| Protection intelligence | Update completes | Troubleshoot the active provider, not old Spybot folders |
| Quick scan | Runs normally | Resolve provider/service health before browsing normally |
Also test one site previously affected by Immunization and one ordinary browser launch. Don't use a live malware sample or deliberately visit a dangerous domain. Verification should prove health without creating a new incident.
Choose the failure path by symptom
The worst uninstall advice applies the strongest remedy first. Use the symptom you can observe, not a forum title that sounds similar.
| Symptom | Likely layer | Next safe move | Avoid |
|---|---|---|---|
| Spybot listed; wizard opens | Normal uninstall | Finish wizard, folders, restart, provider check | Third-party cleanup first |
| Wizard says file is in use | Running process/locked file | Close named component; restart and retry | Taking ownership of broad folders |
unins000 or runtime file missing | Damaged uninstall files | Microsoft recovery; compatible vendor repair | Loose DLL/EXE downloads |
| App gone; folder remains | Data/residue | Verify exact vendor folder and remove it | Registry sweep |
| App gone; Defender still off | Provider registration/another AV | Check all installed providers; capture evidence | Old protected-service commands |
| Spybot reinstalls at boot | Legacy upgrade reininstaller | Identify the specific Common Files AV artifact | Deleting the whole Common Files tree |
If two symptoms coexist, work from least destructive to most specific: restart, normal Windows route, exact folder cleanup, provider verification, documented recovery, vendor support. Preserve the before/after state at every transition.
If the uninstaller or unins000 file is missing
Missing unins000.msg, unins000.exe or a runtime library means the normal uninstall package is damaged. It doesn't mean the missing file should be downloaded from a DLL site. A loose file can be the wrong version, wrong language, unsigned or malicious, and it can't reconstruct the complete install manifest.
Restart first and try both Settings and Control Panel. Then use Microsoft's current install/uninstall troubleshooting guidance. Preserve the product name/version and exact error. Windows 11 now emphasizes built-in recovery and publisher support; the downloadable Program Install and Uninstall troubleshooter remains described for Windows 10 cases.
An older Spybot advisor response in a real missing-uninstaller case recommended installing Spybot over the existing copy to replace missing files, then uninstalling. The recovery logic is reasonable, but the cited example was Spybot 2.1/2.2. In 2026, download only from Safer-Networking and confirm that the installer is compatible with the installed edition/version before overwriting.
If version identity is unclear or the repair setup wants to change providers/features, stop and send the error screenshot plus install path to the official Spybot support form. A clean support-assisted repair is safer than deleting the remaining program directory and leaving registered services behind.
If a Spybot folder is locked or a service still runs
Do one full restart before diagnosing a lock. Then retry deleting only the confirmed vendor folder. If Windows names a process, inspect its digital signature and path. A Spybot-named process running from the verified Spybot directory is relevant; a coincidental filename elsewhere isn't.
Spybot 2 documentation describes Security Center, Scanner and Update service roles. Their presence varies by edition and build. Historical logs use names such as SDWSCService, SDScannerService and SDUpdateService, but this guide intentionally doesn't provide universal service-delete commands. A name copied from a 2013 forum post isn't proof of the current service's protection model.
If the product still opens, use its Advanced User Mode > Settings > System Services controls to stop its own services, apply the change and retry the normal uninstaller. The live FAQ labels much of this support material as legacy, so take a screenshot of what your installed build actually exposes.
Safe Mode is a last diagnostic step for a file lock, not the default uninstall method. If the provider service is protected or access is denied even to an administrator, don't change registry ACLs or ownership across parent keys. That's the point for vendor support.
If Spybot is gone but Windows Security still lists it
First confirm that no second Spybot entry or licensed component remains in Installed apps. Restart again after completing the official folders. Open Windows Security and record the exact provider name and status. Then check whether the intended replacement antivirus is installed; it may be the reason Defender remains passive.
Real community reports include users who removed Spybot but still couldn't enable Defender, including a current-index r/antivirus removal report. Treat that as a real symptom pattern, not a command source. Another thread circulates edits to the protected SDWSCService registration. Those steps are version-sensitive and can leave Security Center in a worse state.
Capture Windows version/build, Spybot edition/version, the Windows Security provider screen, Installed apps and the exact folder/service path if one exists. Send that packet to Safer-Networking. If Windows Security itself reports an important service is off, Microsoft's Protection History and security troubleshooting routes are the appropriate Windows-side evidence.
Don't install another antivirus merely to force the provider list to refresh. That adds a third state to diagnose. Resolve the stale registration or confirm the existing replacement first.
Separate current Spybot 2.x from legacy reininstallers and Spybot 1.x advice
A legacy “Post Windows 10 Spybot-install” artifact was designed to survive an old Windows upgrade and reinstall Spybot afterward. The current live FAQ still says the specific folder C:\Program Files\Common Files\AV\Spybot - Search and Destroy can be deleted when that old reininstaller isn't needed. A real vendor-forum case shows the distinctive symptom: Spybot tries to reinstall at startup after an ordinary uninstall.
Use that cleanup only when you actually have the post-upgrade artifact or the same verified path. Don't delete the parent Common Files\AV directory; it may contain other vendors' upgrade components. This is a symptom-specific legacy third location, not part of every normal Spybot 2.9 removal.
TeaTimer, SDHelper and Internet Explorer BHO instructions belong mainly to Spybot 1.x. If an ancient PC truly has 1.6 or earlier, record the version and use its matching archived vendor procedure. Don't make a current Spybot 2.x user hunt for components that were never installed.
Likewise, an old Windows 7 report about SDHOOKDRIVER isn't a general Windows 11 registry checklist. The vendor advisor in that case recommended technical support. Version, operating system and exact failure must match before an old residue becomes relevant.
Spybot Anti-Beacon is a separate uninstall and rollback job
Search & Destroy and Spybot Anti-Beacon share a vendor, not one uninstall record. Anti-Beacon can apply privacy/telemetry immunizers that survive until undone. Removing Search & Destroy therefore doesn't prove those changes are gone, and deleting Search & Destroy's ProgramData must not be used as an Anti-Beacon reset.
Check Installed apps for a separate Anti-Beacon entry. If it exists and you want it gone, open Anti-Beacon first, review/undo its active immunizers according to its own current interface, then use its own Windows uninstall entry. Reboot and test the Windows feature that prompted removal.
If you want to keep Anti-Beacon, leave it alone and document that choice. A complete removal of one product doesn't require removing every tool from the same publisher.
Choose permanent removal, clean reinstall or replacement before the last cleanup
For a clean Spybot reinstall, record the edition and legitimate license route, finish the uninstall and remove the two verified folders so damaged settings aren't carried forward. Download the installer only from Safer-Networking and follow our current Spybot setup guide. Verify publisher signature and provider ownership again after installation.
For permanent removal, keep the cancellation receipt and license record somewhere outside the old program directory, then let Defender or the replacement antivirus own real-time protection. If the product's role no longer fits your PC, our current Spybot review explains the difference between a supplemental scanner and full real-time suite.
Don't bounce between reinstall and manual deletion during the same attempt. Pick a state, verify it, then move to the next. A reinstall used only to repair the uninstaller should be followed by the normal wizard before folder cleanup.
Uninstalling Spybot doesn't cancel a paid renewal
Windows has no authority over the payment processor's subscription record. If you bought a paid edition, check whether renewal is automatic before deleting local evidence. Our Spybot cancellation and refund guide follows the current direct 2Checkout route and separates stopping renewal from requesting money back.
Save the order number, cancellation effective date and refund case outside Spybot. The Spybot pricing guide covers current edition/term language. Uninstall only after the billing state is documented; otherwise a successful local cleanup can still be followed by an unexpected charge.
When to stop cleanup and send an evidence packet
Stop improvising when a protected service denies changes, Spybot remains the provider after two restarts, the uninstaller needs unknown-version files, a folder is owned by a different signed product, or Windows Security itself won't run. Those are identity/state problems, not ordinary leftover folders.
- Windows edition, version and build.
- Spybot edition/version from the app, installer record or signed file properties.
- Exact uninstall error text and timestamp.
- Screenshot of Installed apps or Programs and Features.
- Screenshot of Windows Security provider status after reboot.
- Exact process, service or folder path that remains.
- What was already tried, in order.
- Whether Quarantine and Immunization were reviewed before removal.
Redact the license key, account email, device name and unrelated applications if needed. Don't send a full registry export to a public forum. A small precise packet lets support distinguish a damaged uninstaller, protected service, old upgrade artifact and ordinary data folder without asking you to repeat destructive experiments.
Spybot uninstall FAQ
How do I completely uninstall Spybot Search & Destroy?
Review Spybot Quarantine, restore only files you have positively identified as wanted, undo Immunization, then remove Spybot through Windows Settings or Programs and Features. After the wizard finishes, delete only the confirmed Spybot program folder and the vendor-named ProgramData folder, restart Windows and verify one active real-time antivirus provider.
Should I undo Spybot Immunization before uninstalling?
Yes. Safer-Networking's current Spybot 2.x FAQ recommends undoing Immunization before removal. Immunization can place entries in the Windows hosts file and browser permission stores, so rolling it back while Spybot still knows what it changed is safer than trying to reconstruct those changes after deletion.
What happens to files in Spybot Quarantine after uninstalling?
The vendor warns that quarantined files can't be restored after Spybot is uninstalled. Review them first. Restore only a specific item you understand and need; don't bulk-restore unknown detections. Scan any restored file with the antivirus provider that will remain active before opening it.
Which Spybot leftover folders can I delete?
The official Spybot 2.x FAQ names the Spybot program folder under Program Files or Program Files (x86), depending on architecture, and C:\ProgramData\Spybot – Search & Destroy. Confirm the exact folder name and parent before deletion. Don't turn a search for the word Spybot into a registry or AppData sweep.
Why will Spybot not uninstall from Windows Settings?
Restart Windows, stop any active Spybot scan, close the tray app and browsers, then retry Settings or the Control Panel route with administrator approval. If the wizard is missing or fails, use Microsoft's current install/uninstall troubleshooting guidance and preserve the exact error before trying a vendor-approved repair.
What should I do if unins000.msg or unins000.exe is missing?
Don't download a loose uninstaller file from a third-party site. Record the installed Spybot version and error. Microsoft's uninstall troubleshooting route is the first recovery step. An older official-forum recommendation was to install a compatible Spybot build over the existing copy to restore missing files, but in 2026 that should use only the vendor installer and a version confirmed as compatible.
Why does Spybot still appear in Windows Security after removal?
Restart first and check whether another Spybot entry remains in Installed apps. If only the provider record remains, capture the Windows Security screen, Windows version and old Spybot version and contact Safer-Networking. Don't paste old LaunchProtected, service-delete or registry-permission commands into current Windows without product-specific support.
Will Microsoft Defender turn back on after Spybot is removed?
Microsoft says Defender automatically turns on when there's no other security product installed and working. After reboot, open Windows Security, confirm the provider and real-time status, update protection intelligence and run a Quick scan. If another trusted antivirus is intended, verify that provider instead.
Does uninstalling Spybot cancel its subscription?
No. Uninstalling changes the Windows installation only. A recurring Spybot order must be cancelled through the payment processor attached to that order, currently 2Checkout for the direct checkout we verified. Save the billing confirmation independently before deleting local software.
Does removing Spybot also remove Spybot Anti-Beacon?
No. Spybot Anti-Beacon is a separate product with its own installation and privacy changes. Confirm whether it appears separately in Installed apps and use its own undo/uninstall workflow. Don't assume Search & Destroy removal reversed Anti-Beacon immunizers.
Bottom line: roll back, uninstall, clean narrowly, verify
The safe sequence is short: review Quarantine, undo Immunization, run Spybot's uninstall from Windows, remove only the vendor-named program and ProgramData folders, restart, then confirm one real-time antivirus is active. That handles the product, its supported persistent changes and the protection handoff.
When the normal path fails, match the remedy to the symptom. Repair a missing uninstaller with Microsoft/vendor guidance, handle a verified legacy reininstaller as a legacy artifact, and escalate a protected Security Center record with evidence. Don't turn “complete” into deleting everything a search box finds.