
How to Uninstall Scanguard Completely
Remove the app with the vendor-supported path, restart, verify its background components are gone and make sure another antivirus is actually protecting the device.

Shortest safe path: Use Scanguard’s own uninstall command on Windows or macOS, approve only the operating-system prompts you initiated, and restart. Confirm the app and its background process do not return, then check Windows Security or your intended replacement antivirus. Do not use a registry cleaner or delete broad system folders. Uninstalling Scanguard does not cancel automatic renewal.
Before removing Scanguard, preserve access and line up protection
Uninstalling an antivirus creates a short transition between security providers. Do the preparation while Scanguard still opens: save work, finish or stop any scan, and note whether device encryption or another security tool is reporting a problem. Download a replacement only from its official site if you already chose one, but do not start a second real-time antivirus before the first is removed. Two active engines can conflict over file access, web filtering and quarantine.
Make sure you can use an administrator account. On Windows, User Account Control should ask whether the Scanguard uninstaller may make changes. On macOS, the supplied uninstaller can request an administrator name and password because Scanguard uses a system extension. Those prompts are expected only after you start the removal yourself. A call, pop-up or email asking for remote control, a one-time code or payment is not part of this process.
| Prepare | Why it matters | Do not do |
|---|---|---|
| Save work and close scans | Prevents locked files and lost work | Force power-off during removal |
| Confirm administrator access | Required for service/extension changes | Share credentials with “support” |
| Keep a trusted replacement ready | Shortens the unprotected interval | Run two real-time suites together |
| Record subscription state | Removal does not alter renewal | Assume uninstall means cancellation |
If the device is shared, tell other users when protection will change and ask whether a work or school administrator installed the product. Managed computers can reapply software or browser policy after a user removes it. In that case, a returning component may be intended management behavior rather than a failed consumer uninstall, and the administrator owns the safe removal decision.
If the reason is a surprising charge rather than a software problem, preserve the payment records before changing anything. Our Scanguard charge guide separates renewals, add-ons, duplicates and unauthorized payments. If you are deciding whether the product is worth keeping, use the current evidence and limitations in our full Scanguard review rather than treating uninstallation as a billing remedy.
Uninstall Scanguard on Windows 11 with the official route
Scanguard’s current Windows 11 instructions begin in Search. Open Start or press the Windows key, type Scanguard, select the app result and choose Uninstall in the right-hand panel. Windows opens Installed apps. Find Scanguard, open the three-dot menu and choose Uninstall, then confirm the Windows prompt.
Approve the User Account Control dialog only if it names the expected Scanguard uninstaller and appeared because of the action you just took. In the Scanguard Uninstall window, choose Uninstall and let it finish. The official sequence ends with a restart and a successful-uninstallation state. Do not keep opening the app or kill the process while files and services are being detached.
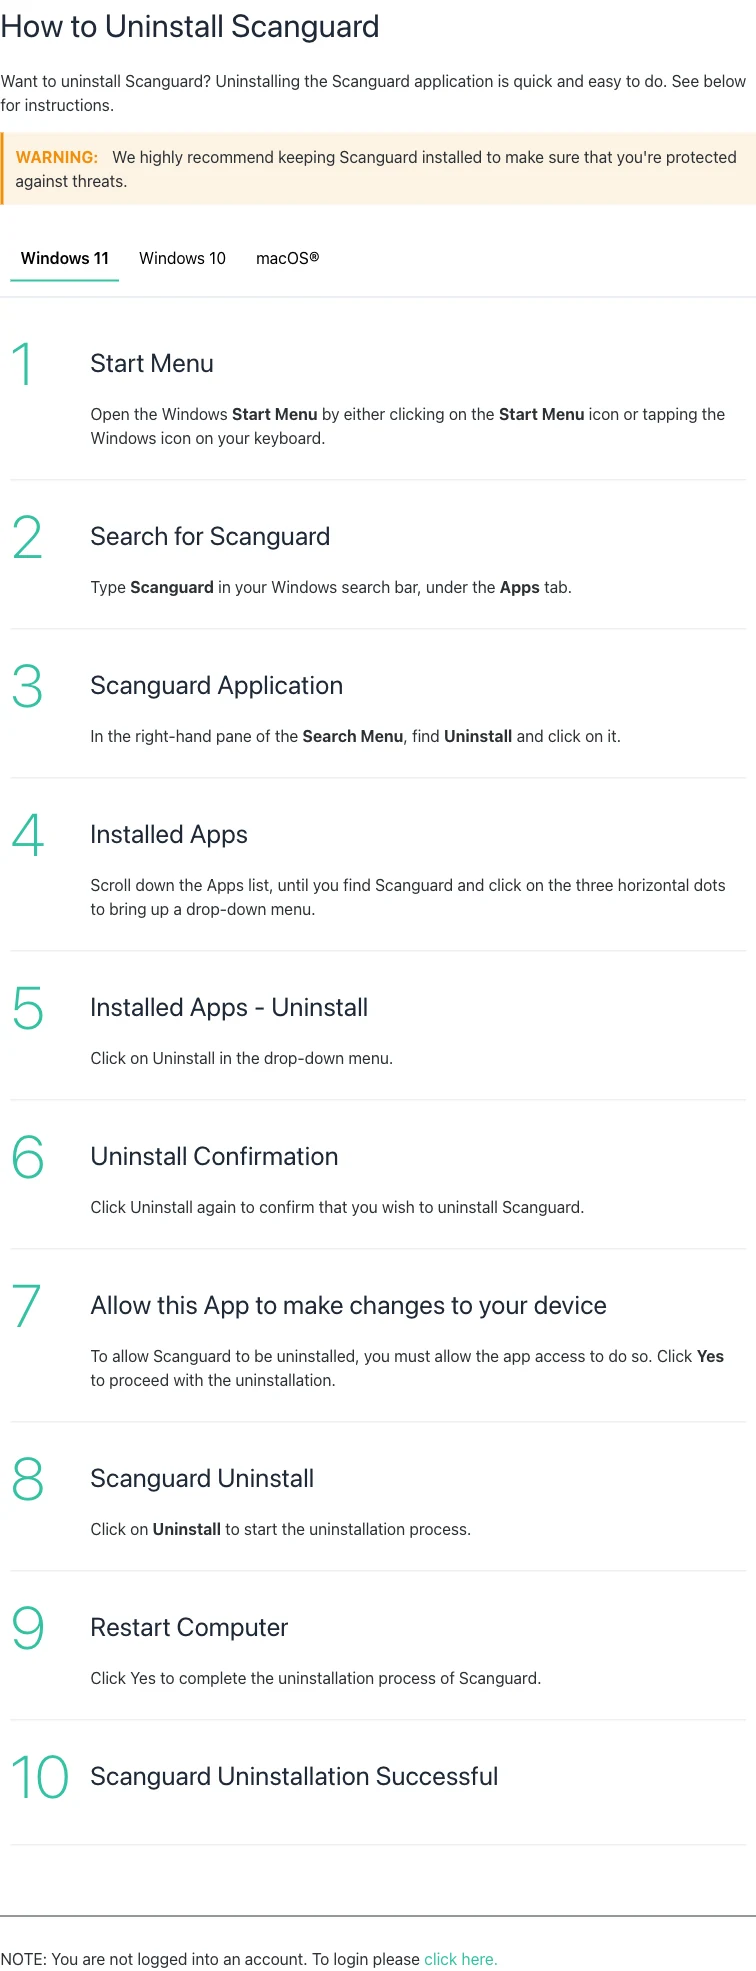
Keep the computer connected to power during the operation. Network access is not a reason to accept unrelated downloads, but the uninstaller or Windows may need to complete a signed component change. If an unexpected browser page opens, close it and return to the local uninstall dialog; surveys and retention offers are not required to finish removal.
The same result can be reached from Settings → Apps → Installed apps, which matches Microsoft’s current removal guidance. Use one normal route; repeatedly launching both can create competing dialogs without making the removal more complete.
Uninstall Scanguard on Windows 10 from Apps or Programs and Features
On Windows 10, open Start and search for Scanguard, then choose Uninstall. Depending on the build and how the package registered, Windows can take you to Apps & features or the classic Programs and Features list. Select Scanguard and choose Uninstall or Uninstall/Change. Approve the expected UAC request, complete the Scanguard uninstaller and restart.
Microsoft documents both Settings and Control Panel paths because not every desktop program supports removal from the same screen. If Scanguard appears in one list but not the other, that does not prove it has two installations. Use the entry whose publisher and install context match the product. Avoid deleting the Start-menu shortcut first: removing a shortcut only removes the shortcut.
| Windows state | Correct next step | What it does not prove |
|---|---|---|
| Scanguard listed in Apps | Run Uninstall and finish the vendor dialog | That subscription renewal is off |
| Shortcut gone, app still listed | Use Installed apps/Programs and Features | That background services are gone |
| App absent after removal | Restart and check processes/providers | That another antivirus is active |
| Entry remains or errors | Use Microsoft repair path below | That registry deletion is required |
Do not judge success while a reboot is pending. Security drivers and services can remain loaded until Windows restarts. A clean restart is part of removal, not an optional cosmetic step.
Remove Scanguard on macOS with its supplied uninstaller
Do not begin by dragging Scanguard to the Trash. Open the app, click Scanguard in the menu bar at the top of the screen and choose Uninstall Scanguard. Confirm the request. macOS then asks for administrator credentials so the uninstaller can modify the Scanguard system extension and the application itself. Enter them in the genuine macOS dialog you triggered, finish the process and acknowledge the success message.
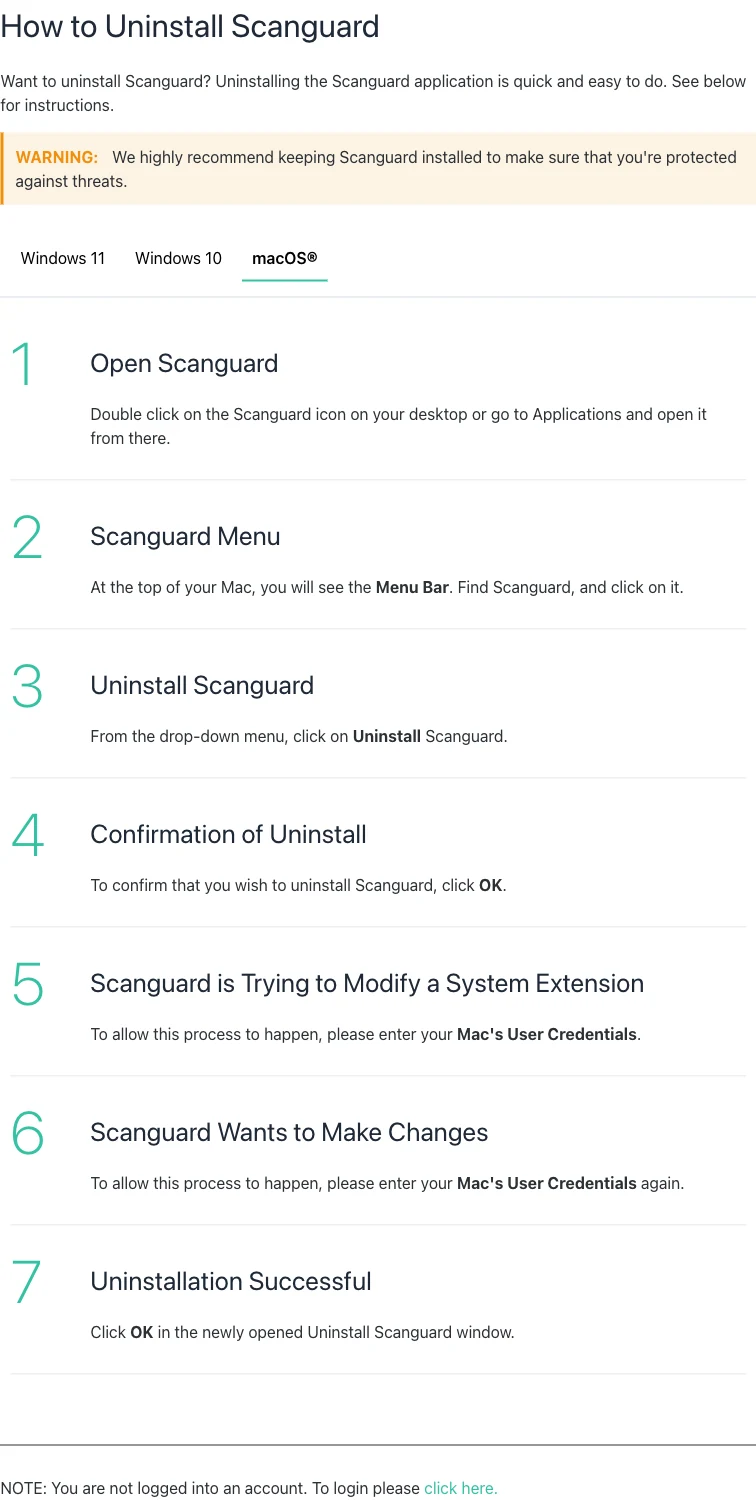
This matches Apple’s June 2026 app-removal guidance: when an app includes an uninstaller, use it because it may remove login items, extensions, caches and other support data that dragging the app to the Bin does not. The uninstaller belongs to Scanguard, while the credential sheet and extension authorization belong to macOS.
If the Scanguard menu does not appear, make sure the app—not Finder or a browser—is the foreground application. If it will not launch, skip to the failed-macOS section rather than dragging random items from Library folders. A missing window does not reveal which extension or service still owns a file.
Restart, then prove that removal actually finished
After reboot, search installed applications again. Scanguard should not appear as an installed app, and launching an old shortcut should not restore it. Open Task Manager on Windows or Activity Monitor on macOS and search for Scanguard by name. A stale search result or deleted shortcut is weaker evidence than an empty installed-app list plus no returning process after a clean restart.

Wait a minute after sign-in before checking processes because startup tasks do not all appear instantly. Then repeat the check after opening a browser and Windows Security or System Settings. This catches a delayed background component without turning a single transient process into a false alarm. Record the process path before ending anything you do not recognize.
Do not use “zero files containing the word Scanguard” as the success standard. A browser history entry, downloaded installer, receipt, log or quarantine record can legitimately preserve the name without running the product. The important question is whether executable components, services, extensions or startup items still load. Delete personal installers or logs only if you no longer need them for troubleshooting or billing evidence.
Verify Microsoft Defender or the intended Windows antivirus is active
Microsoft says Defender Antivirus should turn on automatically when another antivirus is uninstalled. Open Windows Security, choose Virus & threat protection and inspect the current provider. In Security providers, confirm exactly one intended real-time antivirus reports active. Update protection intelligence and run a Quick scan.
If Windows Security says protection is managed by another provider that you did not intend to keep, restart once more and check installed apps for that provider. If no provider activates, stay away from risky downloads and email attachments while you repair the state. Run Windows Update, check for a pending restart and use Microsoft’s security troubleshooting before installing multiple products in panic.
| Verification | Healthy result | If not |
|---|---|---|
| Virus & threat protection | One intended provider active | Restart and inspect Security providers |
| Protection updates | Current intelligence downloads | Check network and Windows Update |
| Quick scan | Starts and completes normally | Resolve provider/service conflict |
| Installed apps | No unintended second AV | Remove it through its vendor path |
A green browser icon or firewall status is not a substitute for antivirus-provider status. Windows Firewall and Microsoft Defender Antivirus are different controls. Verify the protection layer you actually need.
On Mac, inspect login items and extensions without deleting blindly
Open System Settings → General → Login Items & Extensions and look for an entry that is clearly attributed to Scanguard or its verified developer. Apple’s current Login Items & Extensions guide explains that background activity, network extensions and endpoint-security extensions are managed in related panels. Names vary by macOS version, so use the publisher information and the app’s own support evidence.
If the supplied uninstaller finished and no Scanguard-attributed item remains, do not remove unrelated network filters, VPNs, backup helpers or corporate management extensions. If a verified Scanguard item persists and still loads after restart, capture its exact name and status for support. The goal is product-specific cleanup, not an empty Extensions screen.
Also check Privacy & Security → Full Disk Access for a clearly identified stale Scanguard entry. Scanguard’s current installation instructions require Full Disk Access for protection, but revoking a visible permission is not the same as removing the underlying executable. Use permission cleanup as a final verification step after the vendor uninstaller, not as the primary uninstall method.
Check browser extensions only if you installed a Scanguard add-on
Scanguard can be paired with optional browser protection, but the exact extension set depends on what the user installed and which browser owns it. Open the extension manager in Chrome, Edge, Firefox or Safari and examine publisher, permissions and install source. Remove only an extension that you can positively connect to Scanguard or a Scanguard service you no longer want.
For Chrome use Menu → Extensions → Manage extensions; Edge uses Extensions → Manage extensions; Firefox uses Add-ons and themes; Safari extensions appear under Safari Settings → Extensions. A browser extension can survive desktop-app removal because the browser controls it. Conversely, the absence of an extension does not prove the desktop antivirus is removed.
If the extension says it is installed by an administrator, check whether the device is work- or school-managed before changing policy. On a personal device with an unexplained forced extension, preserve the extension ID and policy source, run the active antivirus and investigate management state. Do not paste downloaded registry files or terminal commands from a forum to make the policy disappear.
If Windows says Scanguard cannot be uninstalled
Close Scanguard, restart and try the normal Settings route from an administrator account. Note the exact error and whether the entry still exists. If Windows reports a damaged installer, missing MSI information or a blocked removal, use Microsoft’s Program Install and Uninstall troubleshooter. It is designed to repair corrupted registry keys and program registration that block installation or removal.
Do not download a random “forced uninstaller” from an ad. Do not run a registry cleaner. A tool that can delete services and keys broadly can also remove the evidence support needs or break another security product. If Microsoft’s repair tool cannot identify the package, collect the Windows version, Scanguard version if visible, error text, installed-app screenshot and whether a restart changes anything, then use the current Scanguard uninstall page or authenticated support.
Scanguard also publishes a “0% installation issue” article containing manual folder, temporary-file, DNS and registry steps. That is an installation-repair escalation, not a universal uninstall checklist. Some paths contain shared or user data, and broad registry search-and-delete has no safe ownership boundary. Do not transpose those instructions into routine removal.
If macOS says Scanguard is open, in use or cannot be removed
Quit Scanguard from its menu, close related windows and restart. If the app still reports that it is in use, Apple recommends starting the Mac in Safe Mode and trying the supplied uninstaller again. Apple provides separate Safe Mode instructions for Apple silicon and Intel Macs; follow the branch for the actual hardware rather than guessing at startup keys.
If the app bundle is damaged and the Uninstall Scanguard command cannot open, record the error and check whether Scanguard support supplies a current signed removal utility for that exact build. Do not disable macOS security controls globally and do not delete arbitrary items from `/Library/SystemExtensions`, `/Library/LaunchDaemons` or user Library folders. Those locations are shared by many products, and filenames alone can be misleading.
When a system extension remains active, System Settings can show its developer or category. Capture that information and the macOS version. A vendor-specific, signed removal path is safer than a generic terminal command copied from a different product version.
Manual remnant cleanup is a last escalation, not the definition of “complete”
A leftover receipt, log, installer or empty preference file is not an active antivirus. Focus on components that load: an installed application, process, service, startup item, browser extension, network filter or endpoint-security extension. Before deleting any suspected remnant, verify its exact path, publisher and relationship to Scanguard. Create a Windows restore point or a current Mac backup and keep a copy of anything needed for support.
Never use wildcards against Program Files, ProgramData, AppData, Library, System32 or temporary directories. Never delete every registry match for a brand word. Shared Total Security group components, browser data and ordinary text records may match without being executable Scanguard code. A third-party cleanup utility should not be the default simply because normal removal had one error.
Support may ask for diagnostic logs. Review the collection scope before sending them, use the authenticated support channel and remove unrelated personal material where the tool allows it. A useful case includes the exact error, operating-system build, removal route tried and timestamp; it does not need passwords, full payment-card details or remote access to prove that an uninstaller failed. Keep the case number and the cleanup instruction together for later verification.
The safe escalation order is narrow: official uninstaller, restart, operating-system repair or Safe Mode, vendor support with evidence, then an exact product-specific cleanup instruction for the installed build. If an instruction cannot name the component and explain why it belongs to Scanguard, it is not ready to run.
Install replacement protection without creating a two-antivirus conflict
Once Windows Security confirms Defender is active, you can leave it in place or install the replacement suite you chose. Update the installer and definitions, restart if requested, and confirm the new provider—not both products—owns real-time protection. Run a quick scan and test that the browser and network work normally.
On macOS, download the replacement from the vendor or Mac App Store and approve only the permissions its documented features require. Endpoint-security and network extensions can conflict even when both apps appear to install. Remove Scanguard first, verify its extension is gone, then add the replacement and recheck Login Items & Extensions.
If you have not chosen a replacement, our current best antivirus comparison explains protection, platform and renewal trade-offs, while the free antivirus guide separates genuinely free protection from trials. Do not make the decision based only on the lowest first-year price.
Uninstalling Scanguard does not cancel renewal or create a refund
Software state and billing state live in different systems. Removing the app from one computer does not reliably change a direct Scanguard subscription, Apple subscription, Google Play subscription or PayPal automatic payment. Check the owning account and save a confirmation that shows the service name, status and next renewal date.
For a direct subscription, follow our Scanguard cancellation and refund guide, which distinguishes turning off auto-renew from fully terminating service and requesting an eligible refund. Store purchases must be managed by the store that owns them. Uninstallation can end protection immediately while the paid term and renewal continue, so verify both sides before considering the job complete.
If you removed the product because it seemed suspicious, use the evidence-based boundary in Is Scanguard Legit?. A real company and working software do not make every sales page, renewal or support contact correct; equally, a surprising price does not prove malware. Keep product, billing and impersonation claims separate.
Scanguard uninstallation FAQ
These answers keep removal, protection and billing as separate checks so one successful step does not hide an unfinished one.
How do I completely uninstall Scanguard on Windows 11?
Use Windows Search to find Scanguard, choose Uninstall, locate it in Installed apps, open the three-dot menu and confirm Uninstall. Approve the Windows security prompt, run Scanguard Uninstall and restart. After reboot, confirm the app and its processes are gone and Windows Security shows an active antivirus provider.
How do I uninstall Scanguard on Windows 10?
Open Apps & features or Programs and Features, select Scanguard, choose Uninstall or Uninstall/Change, approve the User Account Control prompt and finish the vendor uninstaller. Restart even if the app disappears immediately, then verify Windows Security protection instead of assuming removal succeeded.
How do I remove Scanguard from a Mac?
Open Scanguard first, choose Scanguard in the macOS menu bar and select Uninstall Scanguard. Confirm and enter an administrator name and password when macOS asks to modify the system extension and application. Finish the uninstaller, restart if requested, then check login items and extensions only for entries you can positively identify as Scanguard.
Why can’t I drag Scanguard to the Trash?
Scanguard installs more than one app bundle on macOS, including a system extension and permissions used for protection. Apple recommends using an app’s own uninstaller when one is supplied because simply dragging the icon to the Trash can leave login items, extensions or support data behind.
Why will Scanguard not uninstall?
First close Scanguard and its visible windows, restart and try the official route again from an administrator account. On Windows, Microsoft’s Program Install and Uninstall troubleshooter can repair damaged uninstall registration. On macOS, Apple recommends Safe Mode when an app says it is in use. Escalate with screenshots and logs before manually deleting system or registry entries.
Does uninstalling Scanguard cancel the subscription?
No. Uninstallation changes the software on one device; it does not reliably turn off automatic renewal or request a refund. Check the subscription state in the account or owning app store separately and keep confirmation. Use the dedicated cancellation and refund process if billing must stop.
Will Microsoft Defender turn on after removing Scanguard?
Windows Security says Microsoft Defender Antivirus should turn on automatically when another antivirus is uninstalled. Verify rather than assume: open Windows Security, check Virus & threat protection and Security providers, update protection intelligence and run a quick scan. Resolve any provider conflict before browsing or installing another suite.
Can I install another antivirus before removing Scanguard?
Avoid running two real-time antivirus suites together unless both vendors explicitly support that configuration. Download the replacement installer from its official source first if needed, disconnect from risky activity, remove Scanguard, restart, verify the operating system’s protection, then install and update the replacement.
Should I delete Scanguard folders and registry keys manually?
Not as the first or routine method. Broad folder, temporary-file and registry deletion can remove unrelated data or damage Windows. Use the official uninstaller, restart, use Microsoft’s repair tool if needed, and ask Scanguard support for a product-specific cleanup path. Only remove a remnant after verifying exact ownership and creating a rollback point.
How do I know Scanguard is fully removed?
The app should be absent from installed applications, no Scanguard process should return after restart, no positively identified browser extension or login item should remain, and one intended antivirus provider should report active. Separately verify whether the subscription is canceled or still renewing; software removal and billing state are different checks.
Completion checklist: app gone, protection active, billing verified
A complete Scanguard removal uses the supplied uninstaller, survives a restart and leaves no verified Scanguard process, startup component or optional browser extension running. Windows users should see Microsoft Defender or one chosen replacement active; Mac users should verify the Scanguard system extension and permissions no longer load.
Stop before broad manual deletion. If normal removal fails, use the operating system’s repair path and vendor-specific evidence. Finally, inspect the subscription separately. The device can be clean while renewal remains on, and cancellation can be complete while the app still needs removal.